先是直接把书上看过的实现了一下,然后看了一下这节原作者写的内容,感觉标题可以改下,但是这里用原文的
直线段的扫描转换总结在这里:
直线段扫描转换
结合本课程实现的算法源码
DDA直线算法
1 2 3 4 5 6 7 8 9 10 11 12 13 14 15 16 17 18 19 20 21 22 23 24 25 26 27 28 void DrawLineDDA (const Point& P1, const Point& P2, TGAImage& Image, const TGAColor& Color) if (P1.x == P2.x)return ;float k = fabs ((P2.y - P1.y) / P2.x - P1.x);float x = P1.x;float y = P1.y;if (0 < k <= 1 )else 1 / k;Swap (x, y);for (; x <= P2.x; x++)auto realY = floor (y + 0.5 );set (x, realY, Color);" " << realY << std::endl;
然后是中点画线算法的实现:
1 2 3 4 5 6 7 8 9 10 11 12 13 14 15 16 17 18 19 20 21 22 23 24 25 26 27 28 29 30 31 32 33 34 35 36 37 38 void DrawLineMidPoint (const Point& P1, const Point& P2, TGAImage& Image, const TGAColor& Color) const int A = P1.y - P2.y;const int B = P2.x - P1.x;const int C = P2.x * P1.y - P1.x * P2.y;int d = A + A + B;int x = floor (P1.x);int y = floor (P1.y);float deltaD;for (; x <= P2.x; x++)set (x, y, Color);"x: " << x << " ,y: " << y << " ,d: " << d << std::endl;if (d < 0 )else if (d < 0 )else
Bresenham画线算法的实现:
1 2 3 4 5 6 7 8 9 10 11 12 13 14 15 16 17 18 19 20 void DrawLineBresenham (const Point& P1, const Point& P2, TGAImage& Image, const TGAColor& Color) const int dx = P2.x - P1.x;const int dy = P2.y - P1.y;int g = -dx;int x = P1.x;int y = P1.y;for (; x <= P2.x; x++)set (x, y, Color);"x: " << x << " ,y: " << y << std::endl;if (g >= 0 )
然后看一下这节的原文主要想干什么
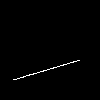
这一节的目标是渲染线框出来,画线框先得会画线,那么最简单的画线要怎么画,像这样:
1
2
3
4
5
6
7
8
void line (int x0, int y0, int x1, int y1, TGAImage &image, TGAColor color) for (float t=0. ; t<1. ; t+=.01 ) int x = x0 + (x1-x0)*t; int y = y0 + (y1-y0)*t; set (x, y, color);
emmm,这个就是直接从第一个点开始,x和y按照参数方程的形式,按照0.01的进度增加x和y,参数范围0到1
画出来长上面这个样子
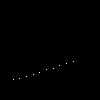
第一次尝试的代码除了效率低,还有个问题就是递增的大小如果变成0.1的话就会画成这样:
最简单的改进就是,我们只计算我们要画的像素,少算一些完全没法画出来的浮点:
1
2
3
4
5
6
7
8
void line (int x0, int y0, int x1, int y1, TGAImage &image, TGAColor color) for (int x=x0; x<=x1; x++) { float t = (x-x0)/(float )(x1-x0); int y = y0*(1. -t) + y1*t; set (x, y, color);
众所周知像素点是整的,不是浮点的,那每次就用x算出当前的参数,再去求y,反正一定是整数,下一个x一定是上一个x+1(如果是x递增的话)
然而上面那个代码有问题的
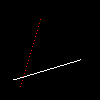
试图画三条线出来:
1
2
3
line (13 , 20 , 80 , 40 , image, white); line (20 , 13 , 40 , 80 , image, red); line (80 , 40 , 13 , 20 , image, red);
第一条线正常
第二条线稀稀拉拉的
第三条线无了……但是理论上第三条线和第一条线画出来应该是一模一样的,只是颜色变成红色
原因就是循环根本进不去:
像前面第二根线,交换一下起点和终点就可以了
修改之后的代码:
1
2
3
4
5
6
7
8
9
10
11
12
13
14
15
16
17
18
19
20
21
void line (int x0, int y0, int x1, int y1, TGAImage &image, TGAColor color) bool steep = false ; if (std::abs (x0-x1)<std::abs (y0-y1)) { swap (x0, y0); swap (x1, y1); true ; if (x0>x1) { swap (x0, x1); swap (y0, y1); for (int x=x0; x<=x1; x++) { float t = (x-x0)/(float )(x1-x0); int y = y0*(1. -t) + y1*t; if (steep) { set (y, x, color); else { set (x, y, color);
能正常画出来
这里原作者贴上了前面几个的效率比较情况:
1
2
3
4
5
6
7
% cumulative self self total 69.16 2.95 2.95 3000000 0.00 0.00 line(int , int , int , int , TGAImage&, TGAColor) 19.46 3.78 0.83 204000000 0.00 0.00 TGAImage::set(int , int , TGAColor) 8.91 4.16 0.38 207000000 0.00 0.00 TGAColor::TGAColor(TGAColor const &) 1.64 4.23 0.07 2 35.04 35.04 TGAColor::TGAColor(unsigned char , unsigned char , unsigned char , unsigned char ) 0.94 4.27 0.04 TGAImage::get(int , int )
无情机翻
建议直接去看总结的直线段扫描转换……
改完后这样:
1
2
3
4
5
6
7
8
9
10
11
12
13
14
15
16
17
18
19
20
21
22
23
24
25
26
27
28
29
void line (int x0, int y0, int x1, int y1, TGAImage &image, TGAColor color) bool steep = false ; if (std::abs (x0-x1)<std::abs (y0-y1)) { swap (x0, y0); swap (x1, y1); true ; if (x0>x1) { swap (x0, x1); swap (y0, y1); int dx = x1-x0; int dy = y1-y0; float derror = std::abs (dy/float (dx)); float error = 0 ; int y = y0; for (int x=x0; x<=x1; x++) { if (steep) { set (y, x, color); else { set (x, y, color); if (error>.5 ) { 1 :-1 ); 1. ;
1
2
3
4
5
6
% cumulative self self total 42.77 0.91 0.91 204000000 0.00 0.00 TGAImage::set(int , int , TGAColor) 30.08 1.55 0.64 3000000 0.00 0.00 line(int , int , int , int , TGAImage&, TGAColor) 21.62 2.01 0.46 204000000 0.00 0.00 TGAColor::TGAColor(int , int ) 1.88 2.05 0.04 2 20.02 20.02 TGAColor::TGAColor(unsigned char , unsigned char , unsigned char , unsigned char )
无情机翻
为什么我们需要浮点数?唯一的原因是在循环体中用dx进行一次除法并与.5进行比较。我们可以通过用另一个变量替换错误变量来消除浮点。我们称之为error2,假设它等于errordx 2。以下是等效代码:
1
2
3
4
5
6
7
8
9
10
11
12
13
14
15
16
17
18
19
20
21
22
23
24
25
26
27
28
29
void line (int x0, int y0, int x1, int y1, TGAImage &image, TGAColor color) bool steep = false ; if (std::abs (x0-x1)<std::abs (y0-y1)) { swap (x0, y0); swap (x1, y1); true ; if (x0>x1) { swap (x0, x1); swap (y0, y1); int dx = x1-x0; int dy = y1-y0; int derror2 = std::abs (dy)*2 ; int error2 = 0 ; int y = y0; for (int x=x0; x<=x1; x++) { if (steep) { set (y, x, color); else { set (x, y, color); if (error2 > dx) { 1 :-1 ); 2 ;
1
2
3
4
5
6
% cumulative self self total 42.77 0.91 0.91 204000000 0.00 0.00 TGAImage::set(int , int , TGAColor) 30.08 1.55 0.64 3000000 0.00 0.00 line(int , int , int , int , TGAImage&, TGAColor) 21.62 2.01 0.46 204000000 0.00 0.00 TGAColor::TGAColor(int , int ) 1.88 2.05 0.04 2 20.02 20.02 TGAColor::TGAColor(unsigned char , unsigned char , unsigned char , unsigned char )
现在,通过引用传递颜色(或者只是启用编译标志-O3),就可以在函数调用过程中删除不必要的副本,这就完成了。在代码中不是单个的乘法或除法。执行时间从2.95秒减少到0.64秒。
星际战甲(不是) 线框渲染这里采用了obJ文件来读取模型
obj文件格式很简单,这里先不提了,回头再水篇(不是
这里是还没写的obj模型文件的链接占坑
这里需要自己想办法弄一下模型读取和相关的数学库,可以直接考虑用原作者写的:
原作者的代码
我这里自己弄了一下,回头obj文章的里面
这节完成后会画出来这个: